HowTo rC3 world maps
This year's remote event will feature a kind of 2D adventure, the rc3 world. This tutorial is intended to show how content and maps can be contributed. If you have any questions after reading this tutorial, or feel like its missing something, please feel free to contact us via mail, and we'll do our best to extend this tutorial.
Metainformationen
Disclaimer
This tutorial is "work in progess", hence its worth checking it from time to time since it will be changed and extended continuously.
Updates
- 2021-01-31: Test instance shut down.
- 2020-12-08: Animations added.
- 2020-12-11: Assembly registration added, Lobbymaps added, hightlighting current layer.
- 2020-12-15: Sound, BBB, Map size added.
- 2020-12-16: We moved to world@ postbox, if you wrote us an email today and got not answer, please try again. :)
- 2020-12-16: New URL scheme, test instance now at: https://test.visit.at.wa-test.rc3.cccv.de/_/global/
(adapt your CORS headers if needed!) - 2020-12-17: Audio: removed external URLs. IMPORTANT: If you want to include streams please contact us!
- 2020-12-20: Starter kit added.
- 2020-12-22: World-Exit added.
- 2020-12-22: Cross-Assembly Links added.
- 2020-12-25: Added exitUrl List
- 2020-12-28: Award Badge property added.
Known Bugs
Following bugs are known and worked on: * Exits on the outer most right tiles dont work * exitUrl in combination wir multiple exits to the same map leads to confusion in starting points. exitSceneUrl works instead, but ist deprecated. * Loading a tileset twice (with the same name) results in interesting rendering bugs (e.g. missing tiles in WorkAdventure) * Tilesets with dimensions above 4096px may cause problems in some browsers.
Quick overview
Limitations
Instances wont scale indefinitely, please keep that in mind while building maps. From our experience the limit is somewhere around 200 players. Maps for 2k players wont make any sense. Please dont try to build lecture halls. There's no sense in idling in the game while watching talks.
Regardless of this you can choose the map size relativly fleixble. Maps in the ballpark of 128x128 tils run quite smooth, maps with 1000x1000 tiles will come with a significant loading time. We hence recomend using a number of smaller maps rather than a single big one.
External links will be sent through a dereferrer.
Starter-Kit
We provide a starter kit in case you don't know how/where to start with your map. Just clone the repository and get your assembly started.
Tiles / Sprites
The maps consist of so-called tiles or sprites. There appears to be a historical difference between these 2 terms, however we do use them interchangeably. For the rC3 map 32x32 tiles are recomended, as different tile sizes may lead to problems. Tiles may have transparent parts and should be stored in the png format.
Layer and attributes
In order for a tile to have more properties than its look, you have to assign the appropriate attributes. This is done using layers: A layer carries attributes, and stores for which fields they should apply.
How will it be linked into the the rC3 world?
To be able to contribute maps to the world, you need to register an assembly and contact world@rc3.world naming your assembly name.
Please store your maps in a git repo of your choice and and notify us in our backend with the URL to clone the repo. Our world infrastructure will then spawn an instance for you and embed the map.
We will pull the maps from your git repo on a regular basis. Players need to reload their page to see the newest version (no live-reload).
Entrypoint / Lobby / Exit
We create central Entrymaps to join the world and lead to the different assembly maps. Here is a list with all known exitUrls so far. Please drop us an email via world@rc3.world naming your assemblyname, that we can reserve an exitpoint to your assembly if your not on our list.
World Exit
We recommend the following tile for your exit(s) back to the lobby map for a more consistent user experience.

You individual exitUrls are listed here
Crossy-Assembly links
There will be placeholders which get automatically replaced by the right url. Example for a placeholder: {<SLUG>/map.json#YourStartLayer}. < and > are important and need to stay in the placeholder!
You can find your slug in the Maschinenraum under Organisational Data -> Basic Data -> "Slug".
If you want to link to the foobar assembly for example and the foobar assemblys slug is foobar, the value for the exit layer would be {<foobar>/main.json}.
Attention: This does not work for the test instance.
Map design
Tiles
Finding tiles:
- There are many tiles available on the internet, often combined into tilesets (multiple tiles for one topic)
- Some examples of websites offering awesome tiles:
- Keep in mind the size of tiles!
- Check the license of the tiles!
- We will not activly check the licenses of your tiles, however we will act on the "takedown on notice" principle!
- Shared Tiles Repo
How to design / "pixel" tiles
You can design your own tiles as well as change exisiting tiles, this is usually referred to as "pixeling". We recommend the use of the editor krita, but there is other editors for pixeling as well.
- Please double check that your tiles are 32x32 pixels in size. You can enable a grid under view -> show grid and under settings -> dockers -> grid you can select the grid size.
- Use transparency if you have to model transitions between different materials. This is more flexible and saves you time by not modeling every transition.
- Pixel-Art Workshop by blinry: media.ccc.de/v/34C3-jugend-hackt-1016-pixel_art_workshop
Walls and collision
To mark tiles as impervious, you have to open the them in the tile editor and set the custom property collides (bool true) for the specific tile. (Do not confuse this with a layer property!)
Tiled provides custom collision shapes for tiles, however these are ignored by our software.

Tile integration
Linking to external tilesets in TSX format is not possible, tiles need to be embedded in tiled (see below). (PNG files need to be uploaded to the server as well.)
Maps
Map creation is done with the editor Tiled. Similar to designs in graphics editors a map may consist of multiple layers, which will be overlayed for rendering. Layers can be designed with transparency.
Creating a new map in tiled
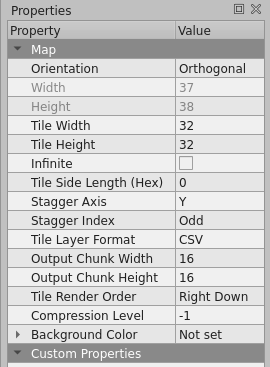
When creating a new map please ensure the following conditions are met:
- The map must be orthogonal
- tile size should be 32x32
- When creating a map it might be useful to use a infite size map, however when saving you need to select a fixed size.
Map design
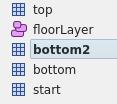
A map may consist of any number of tile layers. Your map needs a start layer which defines where your players spawn. This layer needs to be called start. Additionally you need a layer called floorLayer of the type object layer on which the players move.
For a better mapping experience, highlight the current layer:
Special layers
There are a few special layers which are used for additional features. Except for the start layer these layers are created through the custom properties of individual layers.
Start layer
Your map needs a start layer named start. All locations in this layer that contain a tile (no matter which) will be spawn points for new players. A random tile of this layer will be selected upon entry if there are multiple tiles. It's best if you push this layer to the bottom of your stack, this way the layers above will cover the start tiles.
It's possible to create additional start layers to define more entry points, this for example allows users to jump across the map. These layers work in a similar way as the start layer: Just place tiles anywhere you'd like players to spawn. These layers have no naming requirement, but need the custom property startLayer (bool true). The name of this layer will also function as the jump address that is needed for spawning there. E.g. if your map is called foo.json and the start layer that you want to jump to is called bar, then the jump address/marker is called foo.json#bar.

Exit Layer
Similar to the start layer you can define exits. You create a layer, put a tile on the areas you want the exits to be and give the layer the custom property exitUrl (string). The value of the property should be the map and start layer of the map you want to join to, for example foo.json#bar to get to the map foo.json and the layer bar.

Advanced content
Embedding websites
You can embed websites that will open when stepping on certain tiles. To do this, give the layer the property openWebsite (string). Use https.

Embedding jitsi
Jitsi rooms may be embedded into maps in the same way. Simple set the custom property jitsiRoom (string) and input the room name as the value.

By default jitsi rooms will be bound to the instance, this is to ensure that everyone has their own "hackcenter". Please prefix your room with shared, should you want to share a jitsi room across instaces. (e.g. shared our jitsiroom). No external jitsi rooms will be allowed only the ones provided by us.
Silent areas
Should you not want audio and video communication between participants in certain areas, you can set the custom property silent bool true in a layer defining the area.

Walls / non-accessible areas
For a change, this is not a layer property, but a tile property. For a description, see the Tiles section above.
Award badges
You can award badges when stepping on certain tiles. To do this, give the layer the property "getBadge" (string). The token is a map token, which can be generated in the Backoffice for each badge.

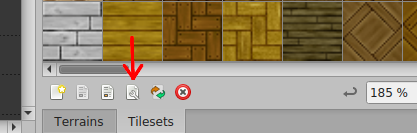
Animated Tiles
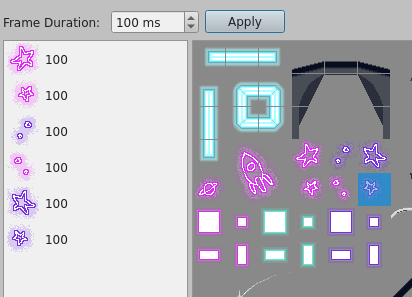
Tiles can be combined to animations (loops), for example to make floating water or bliking lights look better. Therefore all frames need to be a single 32x32 tile. Create animations by editing the tileset, click on the tile to animate (or pick a free tile to not overwrite existing ones) and click on the animation editor:

You can now add all tiles that should be part of the animation via drag and drop to the "playlist" and adjust the frame duration:
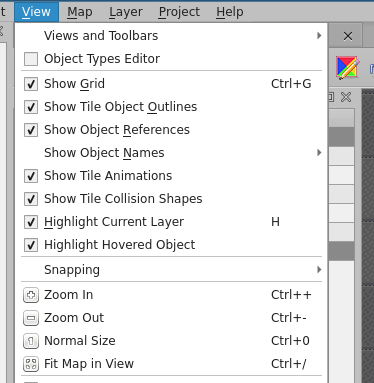
To show animations in tiled, set the corresponding option:
Tip: The engine does tile-updates every 100ms, animations with a shorter frame duration will most likely not look that good or may even do not work.
Bigger animations need to animated in tiled tile by tile. This however is relativly straight forward. (Occationally some tiles dont run in sync with the rest, Cthulu knows why...)
Sound
Layers with the property playAudio (String) will play a sound associated with the tile. Only mp3 files included via a relativ path to your map are supported. External files can not be included. If you want to include streams, please write an email to world@rc3.world. If you want to loop the audio please use the property playAudioLoop (string) instead.

Please only use GEMA-free sound snippets! If you embed streams you will also be required to keep a tracklist to be able to proove to GEMA that you only played "gema-free music".
Packaging, Deployment and Infrastructure
Saving and exporting maps
Maps need to be saved as json files, tilesets should be embedded prior to this. The relevant files the will be you map in json format and will use the tilesets in png format. Infinite maps need to be converted to finite dimension maps before exporting. To do so just untick the "infinite" tick box and safe.
Licenses
If you use CC-BY tiles or pictures or want to use your own license, you can add a file named COPYRIGHT. This file has to be on the same level as your map file.
Folder structure
Please ensure that the right folder structure is used when saving your maps:
- The start map needs to be called main.json and be in the main dir
- Other maps may be in the main dir or in sub folders
- Ensure that links between maps use the correct relative URL
- Ensure that the paths to the tilesets are correct (you may need to adjust them in json by hand)
A example map might look like this:
.
├── bla
│   ├── COPYRIGHT
│   └── keks.json
├── blubb.json
├── COPYRIGHT
├── foo
│   ├── bar.json
│   └── tileset2.png
├── main.json
└── tileset.png
Testing
For testing you may put the map on any server reachable by https and embed the URL in our test instance. Lets assume your map is stored under https://example.com/mymaps/foo.json then the URL to test it would be https://test.visit.at.wa-test.rc3.cccv.de/_/global/example.com/mymaps/foo.json. The option to load external maps is just for testing and will be disabled for rC3.
You might need to set the matching CORS Headers on the server serving the map.
Hosting your own Instance
Please do not try to host your own instance! We will not allow jumps to external instances!
Big Blue Button
We like BBB, but the rC3.world already contains a stable inclusion of jitsi, which we host on dedicated hardware. We currently do not have the resources to make BBB embedding possible. Please don't expect BBB for the rC3.world and use jitsi instead.
Infrastructure
The infrastructure is kindly sponsored by ![]() .
.