HowTo rC3 world maps
As last year's, this year's rC3 will feature a kind of 2D adventure, the rc3.world. This tutorial is intended to explain how assemblies can contribute their own maps and content. For any remaining questions, don't hesitate to contact us via mail; we'll do our best to extend this page.
To exchange with others there is a channel in the public chat.
Meta Information
Disclaimer
This tutorial is "work in progess" and may be occasionally updated, checking it from time to time is recommended.
Known Bugs
The following bugs are already known, and we're working on resolving them:
- Exits on the far right end of a map don't work.
- Loading a tileset twice (with the same name) results in interesting rendering bugs (e.g. missing tiles in WorkAdventure)
Quick overview
Limitations
Instances wont scale indefinitely, please keep that in mind while building maps. Even if the infrastructure itself could handle a high number of clients on a single map, workadventure will still attempt to render all avatars at the same time, to the point that browsers (and network connections) won't be able to keep up. From experience, the limit appears to be around 200 players. Please keep that in mind when designing maps.
Even so, map size is relatively independent from simple user count, and can be set flexibly. Maps at around 50x50 tiles seem to be pretty fine; maps at around 500x500 tiles will take a non-trivial time to load. In general we recommend against unreasonably large maps, so visitors won't get "lost" in them and still have a chance to stumble across each other.
Please don't use any tilesets whose textures are larger than 4096x4096 pixels; rendering errors may occur otherwise, depending on browser and WebGL support
As last year, links leaving the event will be prefixed with a dereferrer ("you are now leaving the event area").
Scripts
You can use all features included in workadventure's
"scripting api extra";
these will all be supported by rc3.world, except for using variables within links
to any kind of ressource (e.g. in the openWebsite property). Additionally,
please note that due to the large amount of review this would necessitate,
including your own self-written javascript will only be possible upon request
(send an email to world@rc3.world).
Starter-Kit
We will again offer a map building starter kit containing a simple map repository which you can clone, use as inspiration, or fork and use as the basis for your own map. However, it is — as well as corresponding tilesets — still a work in progress and will be published here once it is done.
Best Practices
To make visiting the world as comfortable as possible, a set of best practices for designing maps has emerged after last year's rC3 and subsequent divocs. Please read them carefully and keep them in mind when building your new (or updating your old) maps.
The back office will also automatically alert you in case of some especially obvious violations (e.g. exits to nonexistant maps), or suggest improvements.
How does it end up in the world?
To contribute maps to the world, you have to register an assembly.
Please store your maps in a git repo of your choice. Then add a new room to your assembly. Click the button "create" in the "2D map" field. In the next window you can enter the (publicly clonable) URL of the git repo.
Our infrastructure will then periodically pull your map in, run a rudimentary linter on it to check for a few requirements and general consistency, and then deploy it to rc3.world.
Please note that your map may also be rejected in case it contains errors (e.g. exits pointing to maps that do not exist) or is simply in the wrong format. If that is the case, the back office will notify you and show you an appropriate error along with a short explanation — so in case your map doesn't change even after waiting and multiple reloads, please take a look there and check.
Automatic notification
You can also be notified automatically when there is a new linter result.
To do this, create a file named .mapservice in the root directory of your repo.
In this file you enter in which channel of the CCCV rocket chat the bot should write:
{"rocket_channel" : "#<CHANNEL>"}. The channel can also be a person,
in this case you enter {"rocket_channel" : "@nick"} in the file.
Important: The account Rocket.Cat needs to be able to access your channel.
Links between maps
Within your repository you can use normal, relative links — e.g. to get from
one map in main.json to another at garden/secret-base.json, just enter the
corresponding path (same for the other direction: ../main.json will take you
back).
The same also holds for links to tilesets etc.
Please do not use absolute paths (i.e. paths starting with a /), since — on
the rc3.world – these paths would be outside of your repository.
Links to places outside your own assembly
Attention: Does not work as it did last year!
To get to other assemblies or other places in general (e.g. the lobby), use the following link schema:
world://<assembly>/<map>.json
Where assembly is the "technical name" (i.e. slug) of the target assembly, as
set in the Maschinenraum for your own assembly. The remaining path is then relative
to the map repository of the linked assembly.
To get back to the lobby, just use lobby as the slug. The link you'll have to use to connect your map to the lobby will be shown in the Maschinenraum.
Since the validity of such links does not just depend on your own repository but also the entire event (and may even change over time), we cannot check such links statically when pulling in your repository. So please take extra care that these links don't lead into nothingness.
Entrypoint / Lobby / Exit
We will create central entry maps, through which one can reach everyone's assembly maps.
Obviously, your own map should contain at least one exit back to the lobby. As a recognisable and consistent exit, we recommend you use the following tile to mark it:

Map design
Tiles
Fundamentally, maps consist of so-called tiles or sprites (there are differences between these two terms, but they will in the following be used as synonyms). Please only use tiles that are 32x32 pixels large.
Tiles can also be transparent, and are saved in the PNG format.
Finding tiles:
- We provide many tiles created for the event in our
Shared Tiles Repo. These are also available as a git
repository at
https://git.cccv.de/rc3/world-tiles.git. However, please note that we do not support git submodules; please add the files you need to your own repository directly. - Countless tiles are available on the internet, often combined into tilesets (multiple tiles for one topic).
- Some examples of websites offering awesome tiles:
- Be sure to check that the tiles have the correct size (32x32)!
- Check the license of the tiles!
- We will not actively check the licenses of your tiles, but react to violations on a "takedown on notice" principle!
- Document the license of your tiles via the custom property
tilesetCopyright(type string) on the tileset.
How to design / "pixel" tiles
You can also design your own tiles (or edit exisiting ones); this is frequently referred to as "pixeling". We recommend using the editor krita, though of course the principle is the same for other programs.
- Please double check that your tiles are 32x32 pixels in size. You can enable a grid under view -> show grid, and under settings -> dockers -> grid you can select the grid size.
- Use transparency for modelling transitions between different materials. This is more flexible and saves you time by not modeling every possible transition between all materials.
- You can also watch blinry's pixel-art on media.ccc.de
Maps
Map are created with the editor Tiled. As in many graphics editors, a map consists of multiple layers, which are stacked on top of each other when rendering. Layers can also be (partially or wholly) transparent.
Creating a new map in tiled
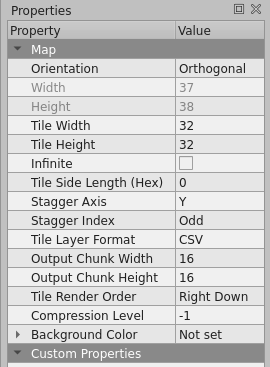
When creating a new map, please ensure the following:
- The map must be orthogonal, and its tile size 32x32 pixels
- When editing a map, it may be useful to set its size to be infinite instead of deciding a fixed size beforehand. However, you will have to set its size back to some (finite) fixed size when saving it before you can load it into workadventure!
Map design - Layer
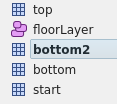
A map can consist of an arbitrary number of tile layers, which are stacked on top
of each other. Each map will need at least one tile layer named start. Visitors
to your map will then spawn on a random tile of this layer by default (you can
move this layer to the bottom of the stack, and let its tiles be covered by other
layers). You will also need another layer named floorLayer of the type
Object Layer, which defines on which layer avatars will move (i.e. which layers
will be rendered above or below them).
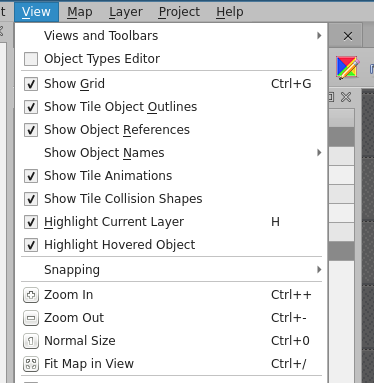
For a better mapping experience, highlight the current layer:
Walls and collision
To mark tiles as impervious, open them in the tile editor and set the custom
property collides to the boolean value true for the specific tile (not the
containing layer!). Although Tiled allows defining custom collision shapes for
tiles, these are unsupported and simply ignored by our software.

Tile integration
Tiles must be integrated into the map in Tiled; references to external tilesets in the TSX format is not possible. (This does not mean that the image data itself will be embedded. PNG must be included in the repository as seperate files as well.)
Please pay attention to the licenses of the tiles you use, and document their
copyright by setting the tilesetCopyright custom property (type string) on each
tileset.
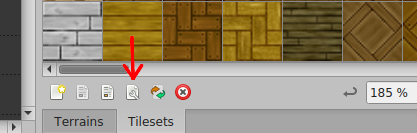
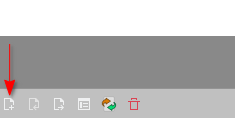
To integrate a tileset into your map, click on "New Tileset" in the lower right corner.
Here you take over all default settings and under "Source" simply select the PNG of your tileset. After that click on "OK" and the tileset is embedded in the map.
Additional functionality per layer
Start layer
Apart from the default start layer it's possible to create additional
entrypoints to your map. These layers work in a very similar way: simply place
tiles anywhere you'd like avatars to spawn. To mark them as an entry point, set
the custom property startLayer (type boolean) to true. The name of this layer
will double as the "jump address" for this entry – if your map is called
foo.json and you have a layer bar that you want to jump to, then the
corresponding address would be foo.json#bar.

Exits
Exits to other maps work similar to entries: create a new layer, put any tile
where you want the exits to be, then give the layer the custom property exitUrl
(type string). The value of the property should be the map and start layer of
the map you want to jump to, for example foo.json#bar to get to the layer bar
of the map foo.json (if you leave out the #bar, the exit will instead lead to
the start layer of foo.json)

For exits to the lobby, the lounge, or other assemblies, take a look at the quick reference above.
Embedding websites
You can embed websites, which will open when upon stepping on predefined tiles.
Same as for start and exit layers, add a layer, place tiles at the desired
positions, and then set the property openWebsite (type string). Use https!
In general we recommend also setting the property openWebsiteTrigger to
onaction, which will cause the web site to open only after explicit user
interaction (a press on the space bar), which makes visiting the world much
easier on older laptops.
You can also set a custom message to be displayed where setting the
openWebsiteTriggerMessage property (which will overwrite the default "Press
SPACE or touch here to open web site").

Also note that websites which are outside of rC3 will be automatically prefixed with a dereferrer, which will alert visitors that they are now "leaving the event area".
Embed website "as map"
Web pages can also be included inline in maps, which means that they are displayed on the map.
To do this, create a layer of type Object Layer and assign it
the custom property url (type string).
Its value is then the URL of the web page to be included, that is to be included.
On this layer you create a rectangular area in which the area,
in which the web page will be displayed.
Additional information can be found in the official WorkAdventure-HowTo.
Embedding Jitsi
You can embed Jitsi rooms in the same way. Simply set the custom property
jitsiRoom (type string) and assign it the name of your Jitsi room as its value.

To avoid unintentional collisions between different assemblies (e.g. so that
everyone can define their own "hackcenter") names of Jitsi rooms are local to
your own assembly. If you want to share a room with a different assembly, just
prefix its name with shared-.
In general we recommend also setting the property jitsiTrigger to onaction,
which will cause the room to open only after explicit user interaction (a press
on the space bar), which makes visiting the world much easier on older laptops
and prevents people accidentally stumbling into your session. You can also set
a custom message to be displayed where the Jitsi can be opened by setting the
jitsiTriggerMessage property (which will overwrite the default "Press SPACE
or touch here to enter Jitsi Meet room").
Embedding Big Blue Button
This works essentially the same as with Jitsi: set bbbRoom to your room's name,
and bbbTrigger along with bbbTriggerMessage to prevent the room from popping
open unexpectedly.
Silent areas
If you want to prevent audio/video communication between participants in some
areas, define a corresponding layer and set the custom property silent (type
boolean) to true. All tiles of this layer will then no longer allow
conversations. This is especially useful for narrow passages or hallways where
it's not always possible to easily walk past each other.

Award badges
You can award badges when stepping on certain tiles. Add a layer of type Object Layer (important!), and then don't place tiles but points and/or rectangles on that layer. To each of these objects you then assign the custom property getBadge (type String). Its value is the token of your badge (which you can create in the Maschinenraum, where you can also create new badges). Note that you will need a Map redeem token.
Badges will then be awarded to visitors walking across the corresponding areas of the map.

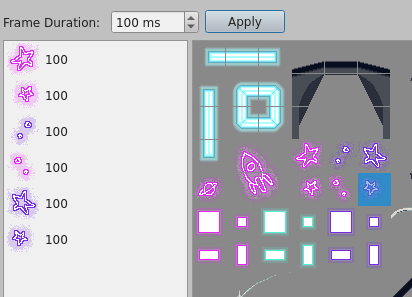
Animated Tiles
Tiles can be combined to animations (loops), e.g. to make floating water or bliking lights look better. All frames need to be their own single 32x32 tile. Create animations in the tileset editor by clicking on the tile to animate (or pick an arbitrary free tile, so as to not overwrite existing ones) and then open the animation editor:

You can now add all tiles that should be part of the animation via drag and drop to the "playlist" and adjust the frame duration (given in milliseconds):
To show animations in tiled, set the corresponding option:
Tip: The engine does tile-updates only every 100ms, do animations with a shorter frame duration will most likely not look that good or even don't work at all.
Larger animations covering multiple tiles need to animated in tiled tile by tile, and work relatively fine. (Occationally some tiles don't run in sync with the rest, Cthulhu knows why...)
Sound
Layers with the property playAudio (type string) will play a sound when stepping
on their tiles. Only mp3 files included via a path relativ to your map are
supported. External files can not be included. If you want to include streams,
please write an email to world@rc3.world. If you want
the audio to also loop, additionally set audioLoop (type boolean) to true.
To reduce playback volume, you can set audioVolume (type float) to a value
between 0.0 (0%) and 1.0 (100%). Users can also set a maximum volume. In this
case the lower value will be used.

Please only use GEMA-free sound snippets! If you embed streams you are also be required to keep a tracklist to be able to prove to GEMA that you only played "gema-free music".
Please document the copyright and license of your music in the map's
mapCopyright property, since there is not (yet) any dedicated property per
audio-playing map layer.
Packaging, Deployment and Infrastructure
Saving and exporting maps
Maps need to be saved as json files, tilesets should be embedded prior to this. The relevant files will be your map in json format along with the tilesets used, which are saved as PNGs.
Infinite maps need to be converted to finite dimension maps before exporting. To do so just untick the "infinite" tick box, then save.
Licenses
Please pay attention to the licenses and copyright of your tilesets. You must (!)
set those via the tilesetCopyright property directly on the tilesets within
your map json! (just add a custom property to the tileset in Tiled).
The same applies to your entire map: document its licence / copyright by setting
the property mapCopyright (type string) on the map (not on a layer / tileset!).
Directory structure
Please ensure that the right folder structure is used when saving your maps:
- The entry map needs to be called
main.json, and be in the root directory - Other maps can be saved in the main directory or in subdirectories
- Ensure that links between maps use the correct relative URL (cf. the corresponding section above)
- Ensure that the paths to the tilesets are correct (you may need to adjust them in json by hand)
Your map repository should then look something like this:
.
├── bla
│   └── keks.json
├── blubb.json
├── foo
│   ├── bar.json
│   └── tileset2.png
├── main.json
└── tileset.png
Testing
A test instance whose behaviour should be as close as possible to the "real" infrastructure used during the event so you can test your map beforehand is available under wa.tabascoeye.de.
Self-Hosting
Please do not try to host your own instance! We will not allow jumps to external instances!